Брз почеток
Добредојдовте во документацијата React! Оваа страница ќе ве водеде во 80% од концептите на React што ќе ги користите секојдневно.
Вие ќе научите
- Како да креирате и вгнездувате компоненти
- Како да додадете обележување(markup) и стилови
- Како да се прикажат податоци
- Како да рендерирате услови и списоци
- Како да одговорите на настани и да го ажурирате екранот
- Како да споделувате податоци помеѓу компонентите
Creating and nesting components
React apps are made out of components. A component is a piece of the UI (user interface) that has its own logic and appearance. A component can be as small as a button, or as large as an entire page.
React components are JavaScript functions that return markup:
function MyButton() {
  return (
    <button>Јас сум копче</button>
  );
}
Сегашто “MyButton” е прогласен, можете да го вгнездите во друга компонента:
export default function MyApp() {
  return (
    <div>
      <h1>Добредојдовте во мојата апликација</h1>
      <MyButton />
    </div>
  );
}
Забележете дека <MyButton /> започнува со голема буква. Така знаете дека тоа е React компонента. Имињата на React компонентите секогаш мора да започнуваат со голема буква, додека HTML ознаките мора да бидат мали.
Погледнете го резултатот:
function MyButton() {
  return (
    <button>
      Јас сум копче
    </button>
  );
}

export default function MyApp() {
  return (
    <div>
      <h1>Добредојдовте во мојата апликација</h1>
      <MyButton />
    </div>
  );
}
Клучните зборови “export default” ја одредуваат главната компонента во фајлот. Ако не сте запознаени со некои делови од синтаксата на JavaScript, MDN и javascript.info имаат одлични референци.
Writing markup with JSX
The markup syntax you’ve seen above is called JSX. It is optional, but most React projects use JSX for its convenience. All of the tools we recommend for local development support JSX out of the box.
JSX is stricter than HTML. You have to close tags like <br />. Your component also can’t return multiple JSX tags. You have to wrap them into a shared parent, like a <div>...</div> or an empty <>...</> wrapper:
function AboutPage() {
  return (
    <>
      <h1>About</h1>
      <p>Hello there.<br />How do you do?</p>
    </>
  );
}
If you have a lot of HTML to port to JSX, you can use an online converter.
Додавање стилови
Во React, одредувате CSS класа со className. Работи на истиот начин како HTML атрибутот class:
<img className="avatar" />Потоа ги пишувате CSS правилата за него во посебен CSS фајл:
/* Во вашиот CSS */
.avatar {
  border-radius: 50%;
}
React не пропишува како да додавате CSS фајлови. Во наједноставниот случај, ќе додадете <link> ознака во вашиот HTML. Ако користите алатка за градење или оквир, консултирајте се со документацијата за да научите како да додадете CSS фајлови во вашиот проект.
Прикажување податоци
JSX ви овозможува да ставите ознаки во JavaScript. Кадравите загради ви дозволуваат “да избегате назад” во JavaScript за да можете да вградите некоја варијабила од вашиот код и да ја прикажете на корисникот. На пример, ова ќе прикаже user.name:
return (
  <h1>
    {user.name}
  </h1>
);
Можете исто така да “избегате во JavaScript” од JSX атрибутите, но мора да користите кадрави загради наместо наводници. На пример, className="avatar" ја пренесува низата "avatar" како CSS класа, но src={user.imageUrl} ја чита вредноста на JavaScript варијабилата user.imageUrl и потоа ја пренесува таа вредност како атрибутот src:
return (
  <img
    className="avatar"
    src={user.imageUrl}
  />
);
Можете исто така да ставите посложени изрази во JSX кадравите загради, на пример, спојување низи:
const user = {
  name: 'Hedy Lamarr',
  imageUrl: 'https://i.imgur.com/yXOvdOSs.jpg',
  imageSize: 90,
};

export default function Profile() {
  return (
    <>
      <h1>{user.name}</h1>
      <img
        className="avatar"
        src={user.imageUrl}
        alt={'Слика на ' + user.name}
        style={{
          width: user.imageSize,
          height: user.imageSize
        }}
      />
    </>
  );
}
Во горниот пример, style={{}} не е специјална синтакса, туку обичен објект {} во style={ } JSX кадравите заградите. Можете да го користите атрибутот “style” кога вашите стилови зависат од JavaScript варијабилите.
Conditional rendering
In React, there is no special syntax for writing conditions. Instead, you’ll use the same techniques as you use when writing regular JavaScript code. For example, you can use an if statement to conditionally include JSX:
let content;
if (isLoggedIn) {
  content = <AdminPanel />;
} else {
  content = <LoginForm />;
}
return (
  <div>
    {content}
  </div>
);
If you prefer more compact code, you can use the conditional ? operator. Unlike if, it works inside JSX:
<div>
  {isLoggedIn ? (
    <AdminPanel />
  ) : (
    <LoginForm />
  )}
</div>
When you don’t need the else branch, you can also use a shorter logical && syntax:
<div>
  {isLoggedIn && <AdminPanel />}
</div>
All of these approaches also work for conditionally specifying attributes. If you’re unfamiliar with some of this JavaScript syntax, you can start by always using if...else.
Rendering lists
You will rely on JavaScript features like for loop and the array map() function to render lists of components.
For example, let’s say you have an array of products:
const products = [
  { title: 'Cabbage', id: 1 },
  { title: 'Garlic', id: 2 },
  { title: 'Apple', id: 3 },
];
Inside your component, use the map() function to transform an array of products into an array of <li> items:
const listItems = products.map(product =>
  <li key={product.id}>
    {product.title}
  </li>
);

return (
  <ul>{listItems}</ul>
);
Notice how <li> has a key attribute. For each item in a list, you should pass a string or a number that uniquely identifies that item among its siblings. Usually, a key should be coming from your data, such as a database ID. React uses your keys to know what happened if you later insert, delete, or reorder the items.
const products = [
  { title: 'Cabbage', isFruit: false, id: 1 },
  { title: 'Garlic', isFruit: false, id: 2 },
  { title: 'Apple', isFruit: true, id: 3 },
];

export default function ShoppingList() {
  const listItems = products.map(product =>
    <li
      key={product.id}
      style={{
        color: product.isFruit ? 'magenta' : 'darkgreen'
      }}
    >
      {product.title}
    </li>
  );

  return (
    <ul>{listItems}</ul>
  );
}
Responding to events
You can respond to events by declaring event handler functions inside your components:
function MyButton() {
  function handleClick() {
    alert('You clicked me!');
  }

  return (
    <button onClick={handleClick}>
      Click me
    </button>
  );
}
Notice how onClick={handleClick} has no parentheses at the end! Do not call the event handler function: you only need to pass it down. React will call your event handler when the user clicks the button.
Updating the screen
Often, you’ll want your component to “remember” some information and display it. For example, maybe you want to count the number of times a button is clicked. To do this, add state to your component.
First, import useState from React:
import { useState } from 'react';Now you can declare a state variable inside your component:
function MyButton() {
  const [count, setCount] = useState(0);
  // ...
You’ll get two things from useState: the current state (count), and the function that lets you update it (setCount). You can give them any names, but the convention is to write [something, setSomething].
The first time the button is displayed, count will be 0 because you passed 0 to useState(). When you want to change state, call setCount() and pass the new value to it. Clicking this button will increment the counter:
function MyButton() {
  const [count, setCount] = useState(0);

  function handleClick() {
    setCount(count + 1);
  }

  return (
    <button onClick={handleClick}>
      Clicked {count} times
    </button>
  );
}
React will call your component function again. This time, count will be 1. Then it will be 2. And so on.
If you render the same component multiple times, each will get its own state. Click each button separately:
import { useState } from 'react';

export default function MyApp() {
  return (
    <div>
      <h1>Counters that update separately</h1>
      <MyButton />
      <MyButton />
    </div>
  );
}

function MyButton() {
  const [count, setCount] = useState(0);

  function handleClick() {
    setCount(count + 1);
  }

  return (
    <button onClick={handleClick}>
      Clicked {count} times
    </button>
  );
}
Notice how each button “remembers” its own count state and doesn’t affect other buttons.
Using Hooks
Functions starting with use are called Hooks. useState is a built-in Hook provided by React. You can find other built-in Hooks in the API reference. You can also write your own Hooks by combining the existing ones.
Hooks are more restrictive than other functions. You can only call Hooks at the top of your components (or other Hooks). If you want to use useState in a condition or a loop, extract a new component and put it there.
Sharing data between components
In the previous example, each MyButton had its own independent count, and when each button was clicked, only the count for the button clicked changed:
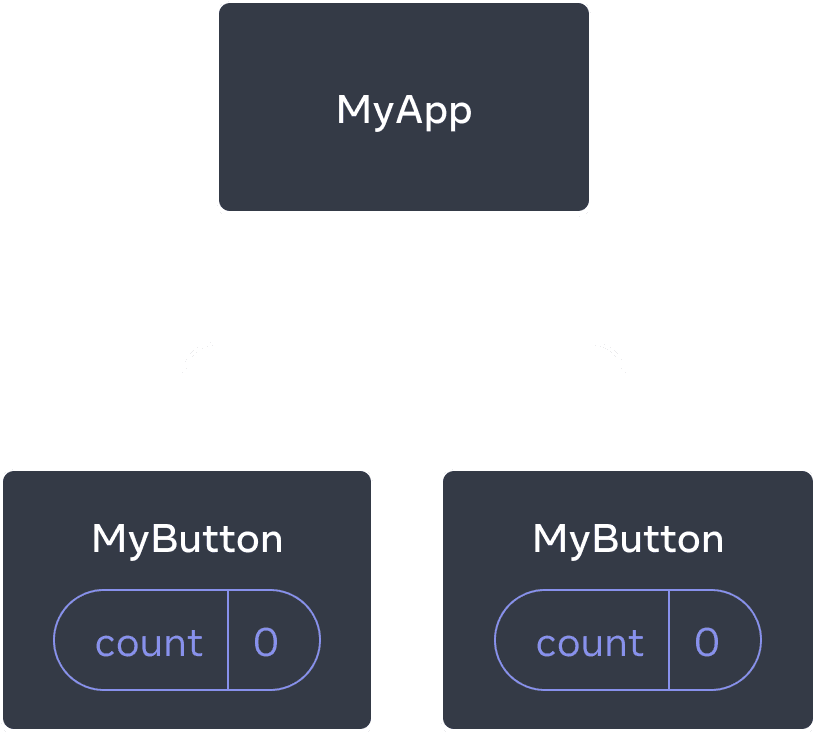
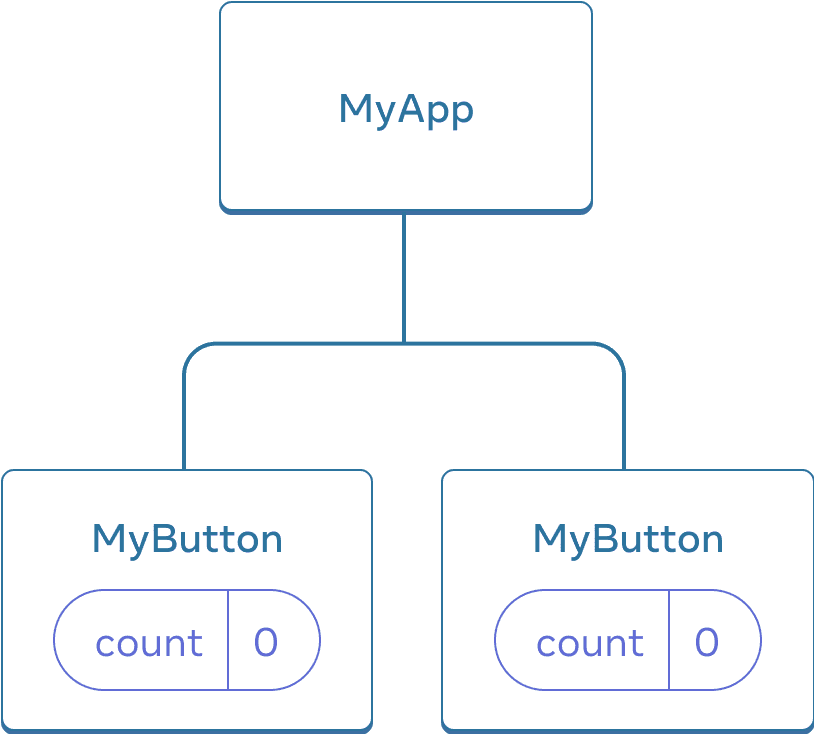
Initially, each MyButton’s count state is 0
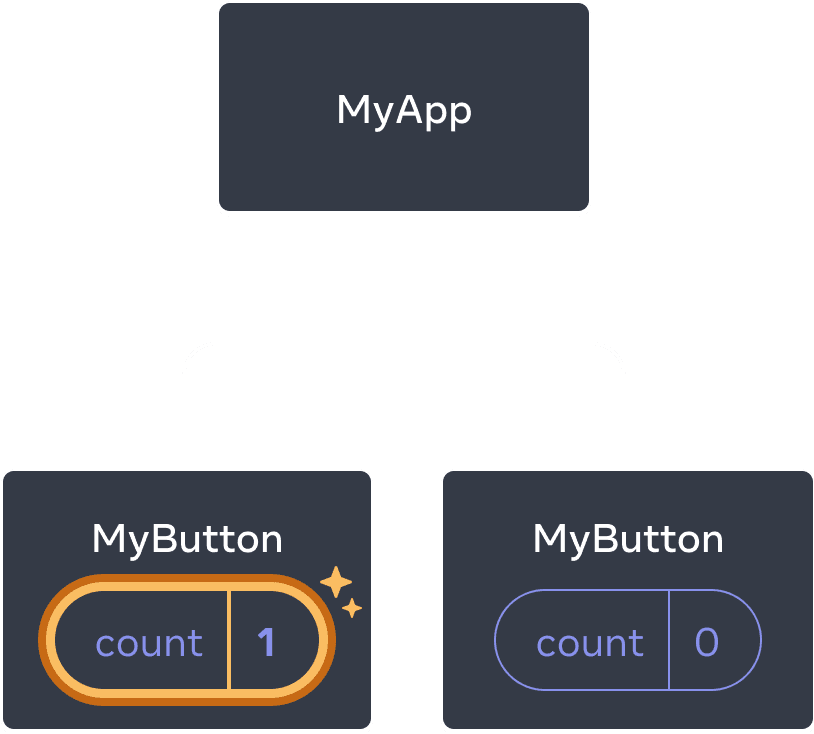
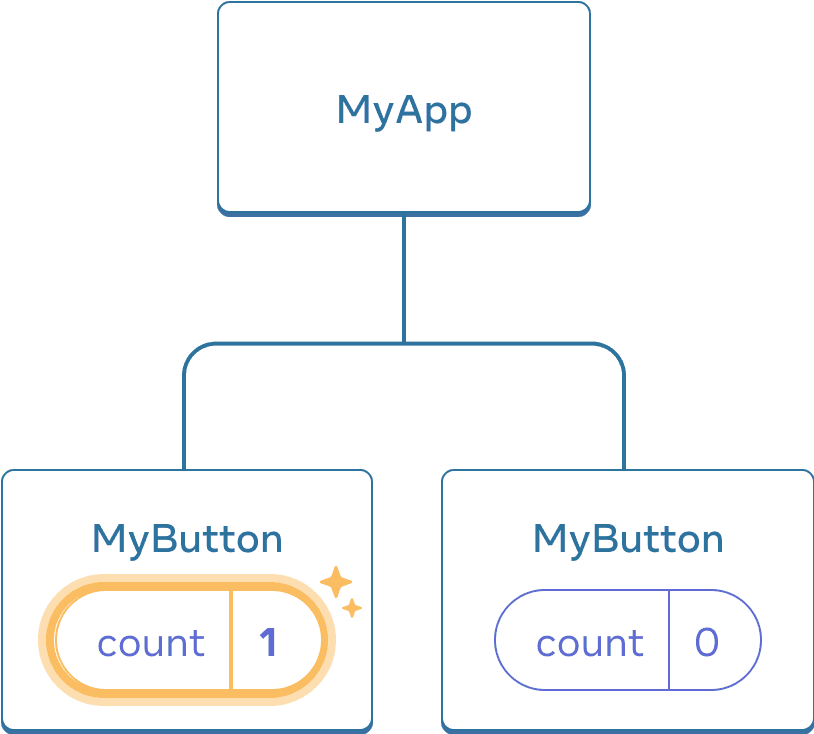
The first MyButton updates its count to 1
However, often you’ll need components to share data and always update together.
To make both MyButton components display the same count and update together, you need to move the state from the individual buttons “upwards” to the closest component containing all of them.
In this example, it is MyApp:
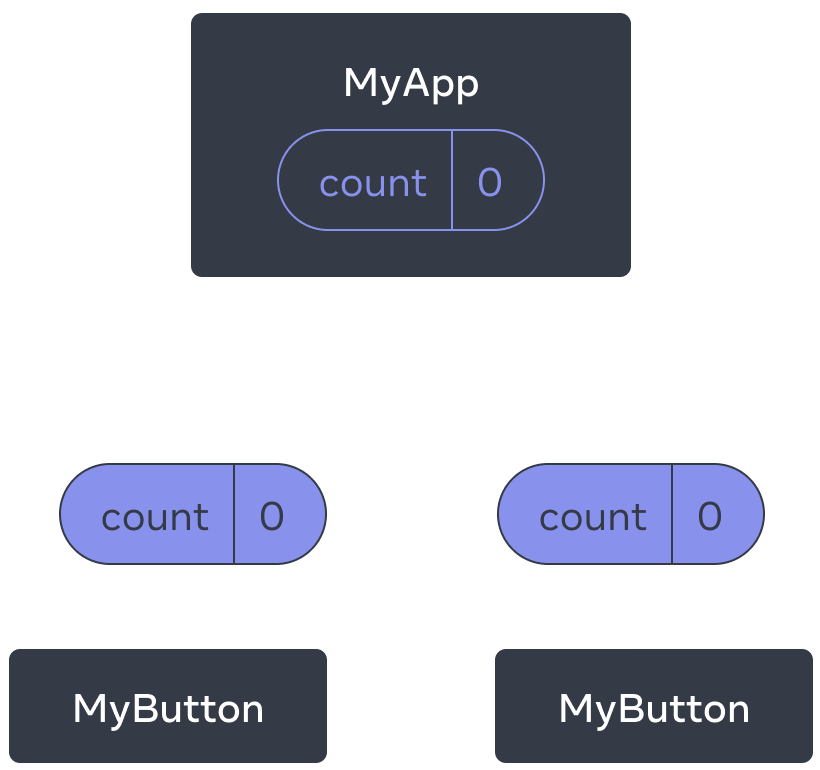
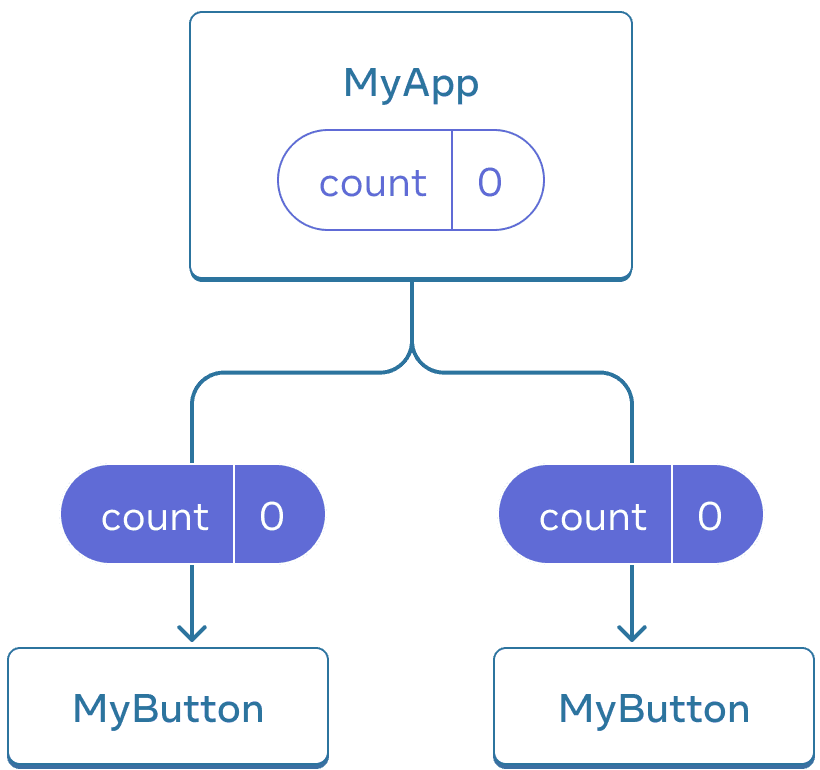
Initially, MyApp’s count state is 0 and is passed down to both children
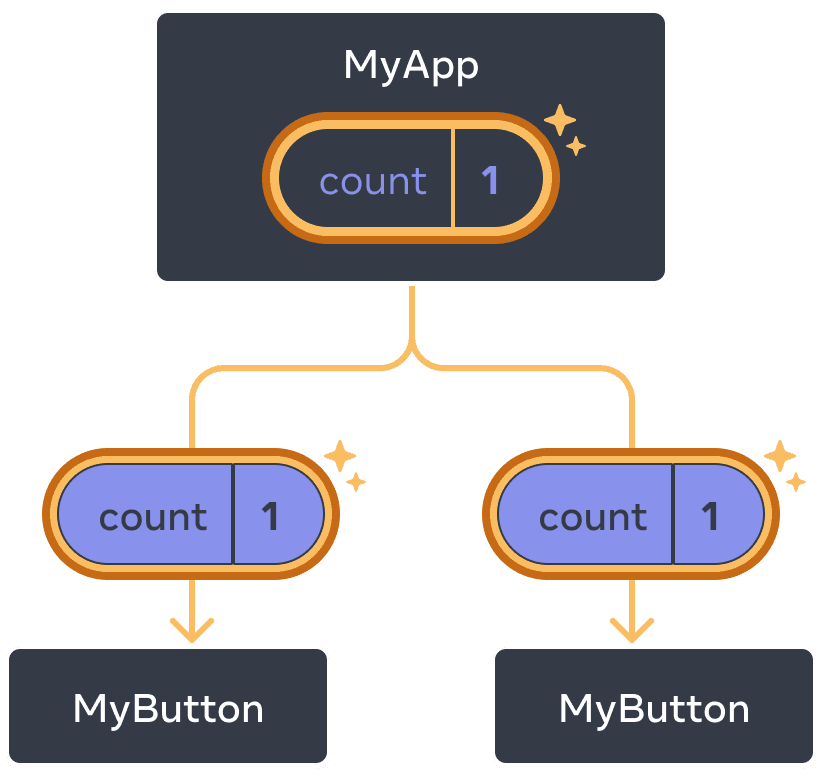
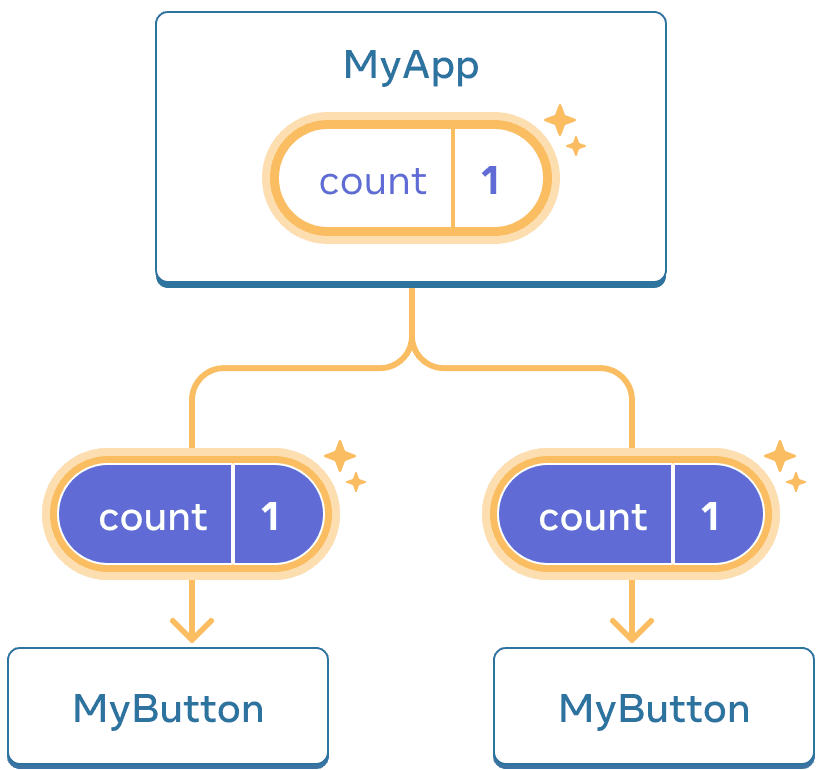
On click, MyApp updates its count state to 1 and passes it down to both children
Now when you click either button, the count in MyApp will change, which will change both of the counts in MyButton. Here’s how you can express this in code.
First, move the state up from MyButton into MyApp:
export default function MyApp() {
  const [count, setCount] = useState(0);

  function handleClick() {
    setCount(count + 1);
  }

  return (
    <div>
      <h1>Counters that update separately</h1>
      <MyButton />
      <MyButton />
    </div>
  );
}

function MyButton() {
  // ... we're moving code from here ...
}
Then, pass the state down from MyApp to each MyButton, together with the shared click handler. You can pass information to MyButton using the JSX curly braces, just like you previously did with built-in tags like <img>:
export default function MyApp() {
  const [count, setCount] = useState(0);

  function handleClick() {
    setCount(count + 1);
  }

  return (
    <div>
      <h1>Counters that update together</h1>
      <MyButton count={count} onClick={handleClick} />
      <MyButton count={count} onClick={handleClick} />
    </div>
  );
}
The information you pass down like this is called props. Now the MyApp component contains the count state and the handleClick event handler, and passes both of them down as props to each of the buttons.
Finally, change MyButton to read the props you have passed from its parent component:
function MyButton({ count, onClick }) {
  return (
    <button onClick={onClick}>
      Clicked {count} times
    </button>
  );
}
When you click the button, the onClick handler fires. Each button’s onClick prop was set to the handleClick function inside MyApp, so the code inside of it runs. That code calls setCount(count + 1), incrementing the count state variable. The new count value is passed as a prop to each button, so they all show the new value. This is called “lifting state up”. By moving state up, you’ve shared it between components.
import { useState } from 'react';

export default function MyApp() {
  const [count, setCount] = useState(0);

  function handleClick() {
    setCount(count + 1);
  }

  return (
    <div>
      <h1>Counters that update together</h1>
      <MyButton count={count} onClick={handleClick} />
      <MyButton count={count} onClick={handleClick} />
    </div>
  );
}

function MyButton({ count, onClick }) {
  return (
    <button onClick={onClick}>
      Clicked {count} times
    </button>
  );
}
Next Steps
By now, you know the basics of how to write React code!
Check out the Tutorial to put them into practice and build your first mini-app with React.